How to Patch a Vinyl Pool Liner
Affordable, fully customizable, and easy to install, vinyl pool liners are a popular choice for both new and veteran pool owners. While known for their durability, even the most meticulously constructed vinyl pool liners are susceptible to damage, like liner leaks. Knowing how to patch a vinyl pool liner can prevent serious budget-busting problems, including flooding, equipment damage, and wasted water and chemicals.
Water Leak vs. Evaporation
If you notice a slight decrease in your vinyl-lined pool's water level, particularly in the hot summer months, don't panic. It's common for pools of any material to lose at least 1/4" of water per day due to evaporation. A decreasing water level becomes a problem when your pool loses more than an inch of water per day, as that can be a sign of a leak. Continuously losing a high volume of pool water is not only a waste of water, but also of the costly chemicals in your pool. Don't let a small water leak turn into a big money leak.
Confirm your leak suspicions using a method called the water bucket test, then locate the leak with the help of a leak detector dye.
Water Bucket Test
To rule out evaporation, use the bucket test. Place a 5-gallon bucket on a step in your pool or on the ground, and fill it with water so that the water level in the bucket matches the water level in your pool. Mark the bucket's waterline with a black, waterproof marker. Then, turn your pool pump off, and let the bucket sit on the step or shallow area in the pool for 24 hours. After 24 hours, compare the water level of your pool against the water level in the bucket. If the pool's water level and the bucket's water level are still equal, even if they're both lower, then your pool is likely only losing water to evaporation. However, if the water level in the bucket is greater than the water level in the pool, a leak is the probable culprit.
PRO TIP: To rule out the possibility of a filter or pump leak, run the same water bucket test again, but with the pump on. If the water level in the pool is significantly lower than the water level in the bucket, it could be a plumbing or equipment leak. Inspect the filter and pump parts thoroughly, and replace any damaged or broken pieces.
Locate the Leak
Large leaks are typically easy to spot in above ground and inground pools, as they usually cause wet spots around your pool or equipment pad. Smaller leaks, however, might give you a run for your money and require some detective skills.
If you can't see the tear in your pool's liner right off the bat, start by looking at the ground around your pool. If your pool has been leaking for a while, the ground will likely be damp around the area of the tear. Damaged areas of vinyl liners will also sometimes bubble inward toward the pool as water seeps behind it.
Once you've figured out the general area of the liner rupture, use a leak detector dye to pinpoint the exact spot. First, turn off your pool pump and let the water settle, then squirt a few drops of the dye into the area by the tear. Watch the dye carefully, as it should be sucked right into the tear.
PRO TIP: Cracks and tears in vinyl liners aren't the only source of pool leaks. Skimmer gaskets, pool lights, and plumbing unions are common culprits. To learn more about troubleshooting and repairing different types of pool leaks, check our our blog post: How to Find and Fix a Pool Leak in 3 Easy Steps.
Repair or Replace?
The age and condition of your vinyl pool liner, as well as the size and severity of the tear, are important factors to consider when deciding if you should repair or replace the liner. If your vinyl liner is brand new and develops a relatively small, easy-to-fix tear, it's definitely in your best interest to try and repair it. Some newer liners may even be covered by the manufacturer's warranty. However, if your liner is significantly older and looking a bit haggard, a large rip may be the nail in its coffin. New vinyl liners are expensive, so attempting a repair is always worth a shot. But there will likely come a time when it is easier to simply throw in the towel and replace it.
How to Patch a Vinyl Pool Liner
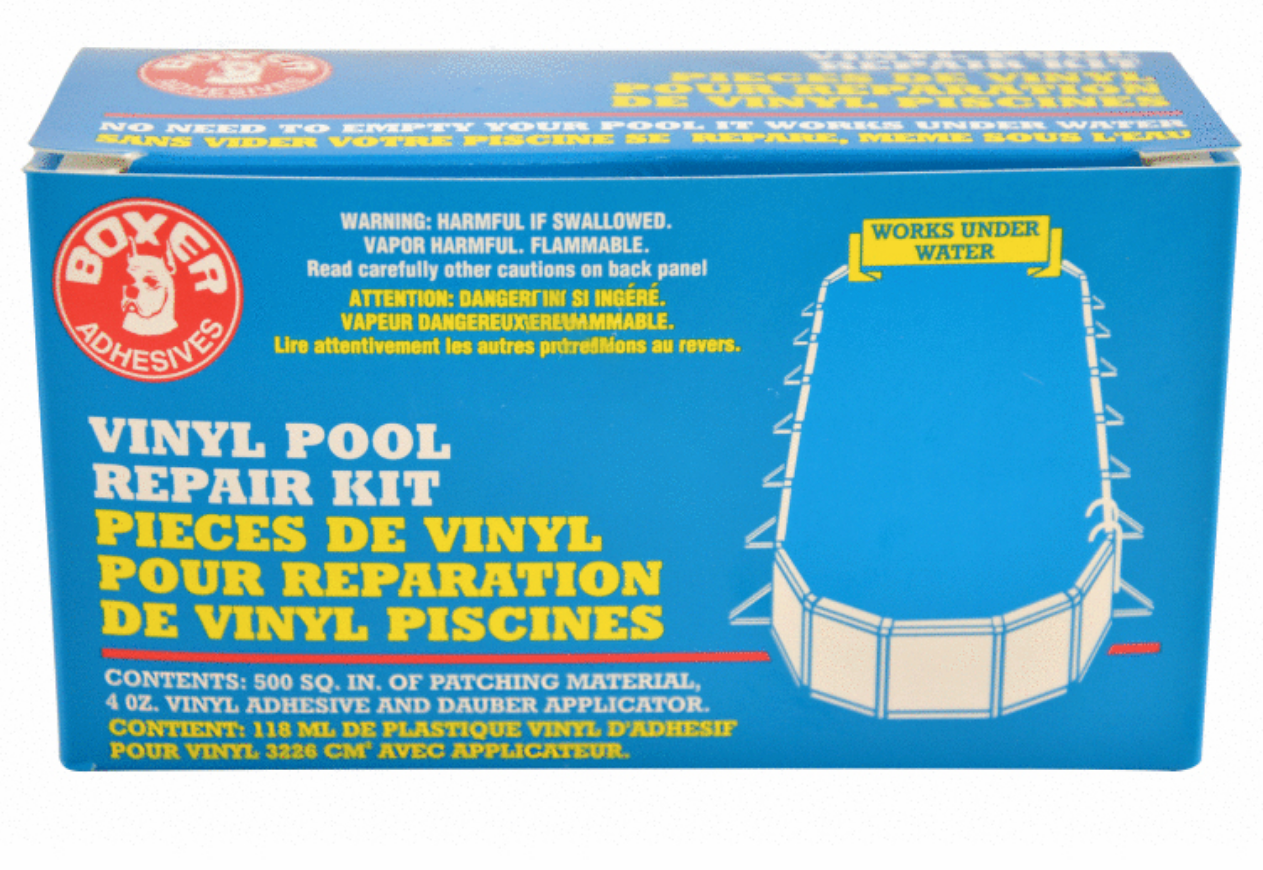
The size of the tear in your vinyl pool liner determines what type of patch you need. For a small rip, use waterproof tape or a handy peel-and-stick patch to cover the leak. Larger tears require a heavy-duty mend, like a patch kit, which is more durable and effective than tape.
Before we discuss how to patch a tear, it's important to note that you don't need to drain your pool to do so. In fact, your pool will develop even bigger problems if you drain it before patching the tear. Draining a vinyl-lined pool will damage the lining by drying it out and exposing it to the sun's UV rays. The repair items needed to fix the tear contain waterproof adhesive, so they won't be ruined if they get wet. You, on the other hand, may want to put on your swimsuit and grab a pair of goggles...
Needed Supplies
Assemble the following supplies and tools to patch your vinyl pool. We recommend keeping these tools on hand, in case your pool liner springs another leak.
- Waterproof tape
- Peel-and-stick vinyl patches
- Vinyl liner patch kit
- Pool brush
- Scissors
- Goggles
- A heavy item to set on top of the patch as it seals
Steps to Patch a Vinyl Pool Liner
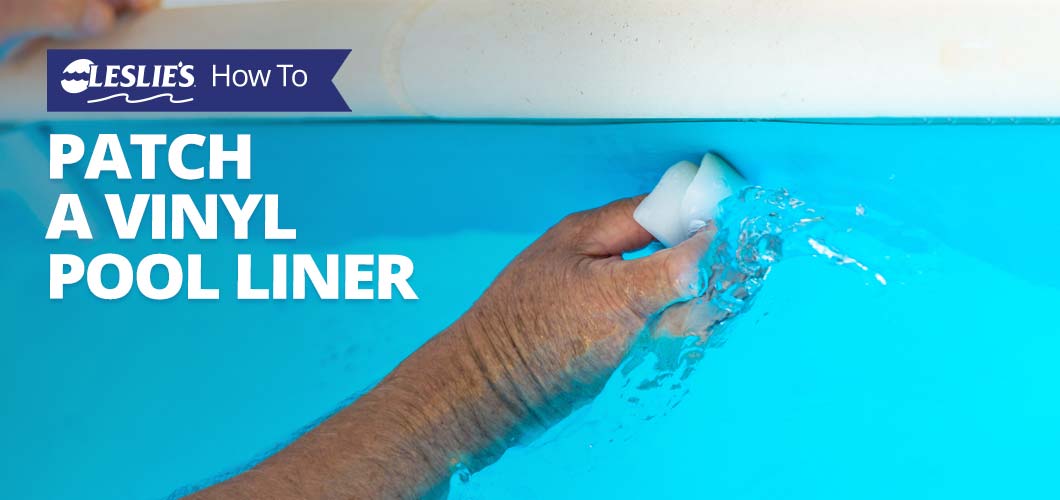
Work through the following steps to patch your vinyl pool liner. If the liner tear is on the bottom of your pool or far away from the edge, you will need to get into the water to repair it.
- Clean the area around the tear. Using a soft nylon brush, gently brush the area around the tear to clear away stuck-on dirt and organic material.
- Trim the patch or tape to size. Leave 2 inches of extra space when cutting the patch or tape to ensure full coverage of the tear.
- Apply adhesive. Coat the back of the patch with the adhesive.
- Stick the patch to the leak. From inside your pool, or from the edge, firmly press the patch or tape over the leak on the vinyl liner. Smooth out air bubbles or bumps, and ensure a strong seal around the patch.
- Add pressure to the patch for 24 hours. Place a clean brick or anything flat and heavy on top of the patch for 24 hours to ensure a strong seal. You may need to get creative for this step if the patch is on a vertical or slanted area, like on the walls or steps. Some patch kits seal quickly, so reference product instructions for more details.
- Double patch if necessary. For extra peace of mind, or if the tear is large, you can layer a second patch on top of the first one. Make sure the second patch is larger than the first for maximum adhesion.
Seeing a rip in your vinyl pool liner can make anyone's heart race — but don't panic, there's a patch for that! Knowing how to effectively patch your vinyl pool liner will save you from damaged equipment and a flooded yard. If you have any questions, stop into your local Leslie's and speak with one of our pool experts.
JUMP IN WITH US ON SOCIAL!